Tuesday, December 29, 2009

2 days 12 hours 42 minutes till the start of the "Slackers Build"

When I take a look at my F-117A, I find that the main part of the build is making sure that the kit cockpit is done carefully.

DSCN0033

The cockpit tub is very basic. And a lot of it will be painting the tub grey...and then drybrushing white to bring out the instrument panel.

DSCN0034

This is a pic of the pilot (I'm still undecided on whether or not to use him). There's also a control stick that has to be painted.

The cockpit to me is challenging. I never used to work on this part of the aircraft, generally preferring to slap the cockpit section together and cover it with the canopy as quickly as possible. Now I'm learning to be patient.

My oldest son has decided to join the "Slackers Group Build" with a 1/25th scale Cadillac Escalade.

Sunday, December 27, 2009

Trumpeter's 1/32 F-14D Super Tomcat

I've been waiting to do a what-if and I've been extremely leery of the Tamiya F-14A 1/32 Black Knights Anniversary Edition kit that I would have to hack n'chop styrene in order to obtain a usable "D" version. I didn't particularly want to mess up my "A" kit and wrestle with the Cutting Edge resin parts, until I felt up to it.

Evidently Chinese model company Trumpeter has stepped up to the plate and offered a big "D" in 1/32nd in order to help those modelers that don't want to hack-up their Tamiya kit in order to get a "D". Maybe this will be worth spending $200.00+ to get this kit just to see how it stacks up.

I was planning to use the Tamiya F-14A to convert to a "D" to make a "what-if" VF-41 Black Aces bird (if the "D" was given to the Black Aces instead of the F/A-18F Super Hornet.

Trumpeter F-14D

I'm sure Trumpeter will get even better as they gain experience. And I appreciate Mr. Song joining A.R.C. to get feedback on the prototype molds that they plan on creating. This is going to go a long way to making Trumpeter a real competitive company.

I'm also looking forward to their MiG 27.

Tuesday, December 8, 2009

More aquisitions? Maybe.

I've been thinking about two more acquisitions that will bring my kit count to almost 50 kits.

The 1/48 scale F-16C/N "Aggressor" Viper from Tamiya and the Hasegawa F-22 Raptor (instead of the Academy kit).

Of course, I would like nothing more than to see this 1/72nd "two plane" release in December of 2009 from Hasegawa's offerings be redone as a single plane kit in 1/48. That would really make my day as Top Gun's Kfir F-21As have never been released except in 1/72nd scale. The only way that you are able to make a Kfir is to take a 1/48 Dassault Mirage IIIc and buy a now "sold out" conversion kit. Hasegawa would actually be making a good move to cater to those modelers who are into "Aggressor" aircraft.


This kit would be well worth spending the money to get if they ever release it in 1/48. Hmmm, wonder if my acquisition bug has been rekindled again. Oh...damn!!!

Monday, December 7, 2009

1/48 Monogram F-117A Nighthawk - a look in the box


Instructions to the kit


Kit decals: They're not yellowed so they should be OK to use.


Fuselage: both top and bottom.


Sprue 1


Sprue 2


Canopy, clear parts and metal-etch parts.

The Unofficial Slackers Group Build

The Unofficial Slackers Group Build

The Categories of Entry:

Primary/Secondary Entries Category: If you have a group build entry that you are going to start on January 1st, 2010 and attempt to finish by December 31, 2010, then you will enter the group build in this category.

100% Secondary Entries Category: If you are not going to start a kit on January 1st, 2010, but are entering only secondary entries, then this is the category you enter it.

def. Primary Entry: a kit that is started on January 1st, 2010 and has not been previously worked on prior to the Group Build Start Date.
Secondary Entry: a kit that has been started prior to the January 1st, 2010 Group Build Start Date.

You must compete in one of the entry categories.

You can enter as many primary and secondary entries as you feel that you can build.

You must notify a group build admin (currently myself) as to what category you are participating in the group build in and what kits you are entering (the reason behind this is so that the build can be semi-organized.

Your Group Build Entries in "In Progress Builds" must have the subtitle: "2010 Unofficial Slacker's Group Build."

I will nominate a secondary Group Build admin, so that there is one other "go-to" person in this group build. I'm accepting any volunteers for this position.

---------------

I'm entering in the Primary/Secondary Entries Category.

My Primary Entry: 1/48 Monogram F-117A Nighthawk.

My Secondary Entries: 1/48 Revell F-14A Tomcat "Sukhoi Killers"
1/48 Revell Supermarine Spitfire Mk. II.
1/48 Monogram MiG 29 Fulcrum.

----------------
Countdown to the "Unofficial Slackers Group Build" Start Date


-----------------
A.R.C. Unofficial Slackers Group Build Participants

ThunderGrunt from A.R.C. (Aircraft Resource Center) is also in on this build. He will be building:

Primary. 1/48 Academy CH-46 NIB
Secondary. 1/48 Academy F-15C 10% started

piko1:
Primary build : F-4G revell 1/72 from the 50 years luftwaffe set xD
secondary : Mi-26 Zvezda 1/72 2% started

PlasticWeapons:
Primary Build: 1/48 Monogram F-117A NIB
Secondary Build: 1/48 Monogram F-8E Crusader

Entry Dated September 10, 2009 - Working on the Revell F-14A

Well, the kids are back at school today so it gives me time to crack open the F-14A Tomcat and start working on it. As a matter of fact, I started doing some of the wheels, the control sticks and the yellow loops on the ejection seat handles.

Wheels

As I am brush painting the wheels, I'm going to be doing several coats of black on the wheels. All I have at current is gloss black. I actually should have gotten flat black. But when you're a two zone bus-ride away from a hobby shop, you do what you have to do in order to get what you need done.

Cockpit Tub

I also worked on the cockpit a bit. The Revell-Monogram cockpit tub isn't completely accurate so I didn't bother doing an pit with the switches being coloured accurately.

As it was, I took great pleasure in getting this part of the cockpit taken care of and out of the way.

Photobucket

As far as the wings were concerned, I took great pains to make sure that the edges all measured up and were accurate. They will probably require a bit of sanding. The fit isn't all that great but it's one of the better Tomcats for the price. I'm not looking forward to fitting the body though. The gaps are enough to drive any sane person crazed.

(pic did not upload, will try later)

The wings had this gap when I first tried to set them together, so I had to rip the wings apart and re-glue them. Luckily the Tenax hadn't set yet, so it was easy to get them to set. I'm still trying to decide if the gears that make the wings go properly should be cut off with a band saw or what. I've had a nasty time of setting them because every stinking time I've tried to set the stupid wings, the damned things didn't match up or they fell off when I was trying to set the top half of the fuselage onto the bottom half.

Photobucket

After all that hassle with the lining up of the two edges of the wings, I set clothes pins to get the Tenax to dry and hold the wings together. Normally, I use Testors tube glue in order to set the match pin points on the wing so that I can Tenax the rest of the wing together, but the Testors glue had hardened in the tube and I had to throw the Testors glue out.

Photobucket

This isn't a sharp picture, but I also got the ejection seat loops all painted yellow. The stripes will have to wait until later. I also painted the control columns black. I'll do the red dot with the 15/0 brush later.

Entry Dated December 30, 2008 - Academy F-22 Raptor in 1/48th Scale.

Well, Academy has brought out the definitive F-22 scale model in 1/48 and I look forward to acquiring this sometime in the New Year when it is released. I've been looking forward to this kit as I'm planning on nailing a few photographs of this at the Abbotsford International Airshow this year. And it looks as if I'll be able to do that at some point.

It's currently on pre-order status at the moment and I'll more than likely be using Sprue Brothers to order the kit. It'll cost me about $65.00 plus shipping depending on what the current rates are.

http://store.spruebrothers.com/shared/StoreFront/default.asp?CS=sbm&StoreType=BtoC&Count1=757335841&Count2=674476265&Keyword=F%2D22&Target=products.asp

Check it out and see what you think.

F-22 Raptor

This will be the last post for this year so until 2009, Happy New Year and happy Model-building.

Entry Dated November 26, 2008 - VF-41 F-14A "Sukhoi Killer" Comprehensive Pre-Build Review

Well, I have decided to start on my F-14A Sukhoi Killers, "Fast Eagle 102" (piloted by VF-41 Commanding Officer (CO) Commander Henry "Hank" Kleeman and RIO Lieutenant Dave "DJ" Venlet - later to be a Vice Admiral and commander of NAVAIRSYSCOM. Regrettably Commander Kleeman would later perish landing an F/A-18 Hornet while CO of test squadron VX-4 on a wet runway) which has been languishing waiting to be worked on since 2006. At some point, I'm going to have to complete it.

Photobucket
Photobucket

Over all, the Revell/Monogram F-14A kit, that I'm using as the baseline for this build, is well worth the money. The only downside of the kit is the lack of features on the ejection seats, the rudimentary features on the cockpit tub, the misshapen nose (error in molding, I believe) and the ever frustrating fact that there are no decent (at rest) exhaust burner cans molded for this kit. Pretty much, my only choices are to go aftermarket, scratchbuild, cannibalize or build a base featuring a runway in it. When an F-14 shuts down, the hydraulic pressure bleeds off leaving one burner can fully open, one completely closed...the right burner can being open, the left closed. My solution is to try to salvage the Fujimi closed burner can or if the worst case scenario happens, I'm going to target Aires and get their Hasegawa F-14 Closed Burner Cans Aires #4121 resin exhaust can detail set.

Photobucket
Photobucket

I also plan to scratchbuild straps and buckles for the GRU-7 ejection seats due to the fact that the injection-molded straps are plain and not very well thought-out. I will try to detail the seat, hooking up hoses (small piano wire painted dark grey/black). Of course, I could just get resin GRU-7s and do it that way, however learning to scratchbuild is all part of the learning process of building a kit, I find that the shaft that holds the GRU-7 can be scratchbuild from the sprue holding the 2 instrument panels, it just needs a little refining (via a lathe?) to get the shape right. I also need to pick up some plasticard to make the plate fitting the shaft to the bang-seat and affixing another shaft to the RIO's cockpit tub. I know most people won't see this effort once the ejection seats are installed, however every bit of scratchbuilding experience, the better I'll become at it.

Photobucket
Photobucket
Photobucket

I also noticed a thick line of flash along the center of the upper half of the fuselage which will have to be sanded down, and the obscured panel lines rescribed. I presume this is from the advanced age of the mold that Revell/Monogram is using to produce the "A" kit. The plastic just bled between the two halfs of the upper fuselage half mold. There's also a couple of nasty scratches in the canopy.

Photobucket
Photobucket
Photobucket

The hydraulics on the landing gear seem to be molded all right and I'm not of a mind to start tinkering with super-detailing the gear bays, nor am I in the mood to start goofing around with cutting open the electronics bays and start adding gizmos and whizz-bangs to the thing. All in all it's a basic OOB build with a few refinements and add-ons.

I did notice the "B" sprue in my kit, However that will remain unused for a different kit.

Photobucket

So that is my comprehensive pre-start review of this kit. Check back with me as I commence on this build.

Items I still need to procure before commencing.

* particulate filter breather mask.
* hose for my Paasche VL (my hose took a walk during my numerous moves)
* moisture trap
* a single-action airbrush for general coverage airbrushing.
* silent air compressor. I don't want to tick off my neighbors.

Entry Dated November 20, 2008 - Building the Spitfire

1/48 for me is not the scale to be doing WWII aircraft. 1/32 would probably be the better scale for WWII aircraft. I've noticed one thing, that my eyes aren't as good as they used to be. And come to think of it, I'll probably need a decent sized table to do scribing on. If I can make a table that goes in the hallway linen closet with enough area for me to actually work on, I think I could manage it. But I'm not too certain of that. And the other frustrating thing is that there isn't really any place to put any of my paints except in the plastic set of drawers that I have. I guess I'm going to have to go to Home Depot or Revy at some point and get them to cut a piece of shelf board so that I can have a decent sized desk in there on which I can actually do something. I got models to build.

As with most Monogram kits, the Spitfire has raised panel lines, as usual. And unfortunately those have to be rescribed (a procedure of scribing beside the raised panel lines and then sanding down the raised panel lines) because you want panel lines that are not raised but can take the wash when you're weathering the aircraft. During the course of learning how to scribe panel lines, I have learned one immutable fact, it's a pain-in-the ass.

The fuselage (still on it's sprue) (close-in so you can see the "raised panel lines")

raised panel lines

The wing (there may be some repairs that I'm going to have to do to that wing due to the fact that sometimes scribers do slip)

spitfire wing

What I'm using to rescribe the panel lines.

bare-metal scriber

Scribing takes a while to do, but as one gets more experienced in doing it, the process gets quicker.

I also am still working on my MiG 29 Fulcrum, but unfortunately, that's been kind of stopped due to the fact that I have to get a moisture trap for my air compressor and that may take me a little while to track down. Plus I need to clear a space in the storage to put my compressor and fix the door so that I can lock the door to the storage room when I'm not airbrushing.

Photobucket

Entry Dated November 16, 2008 - Back to the Bench

Well, it's more than time to get back to the model workbench. One of the first kits that is going to go on my workbench is the "challenge" which sorely has taken far too long to complete (with moves and all). That is the F-14A Tomcat "Sukhoi Killers". I have to thank Tony Hayes for sending me a sheet of Sukhoi Killer decals. He challenged me to finish it in an year. Unfortunately, I couldn't. But I'm going to start the clock ticking this year and try to complete it as soon as I possibly can.

A few basic things looking at this kit, is that I've noticed the abundance of raised panel lines. Considering that this is the first time I'm going to be tackling scribing. That's going to take some time, maybe about four or five days worth of scribing the kit, and that's even before I start messing with any glue.

Photobucket

I need to restrip the cockpit that I did and redo it. It just doesn't look right. The drybrushing method I've been working with leaves white streaks and that's not the effect I want. I may have to use a toothpick to paint the buttons. And the cockpit consoles in the pilot and RIO 'pits need to be modified from the kit parts a bit.

Photobucket

The canopy itself is not able to be used out of box without some serious sanding and finishing. There's a scratch line at the top of the canopy which is visible to the naked eye. So, I'm going to have to sand it with 4000 grit sandpaper to get the scratch out and then polish it with ever higher grits of sandpaper so that I can get the clearness of the canopy back. Then I have to dip it in Future and let it dry.

Photobucket

Entry Dated October 11, 2008 - How To Move With Models, Part II

Photobucket

Last month, we talked about moving with built model kits. This month we're talking about moving with unbuilt kits. As you know, model kits which are unbuilt take up a lot of space. Each model company has different styles of packaging; some packaging such as Hasegawa or Testors being bigger than most. Italeri and Revell-Germany have started being more conservative in their packaging as have Revell - North America (or what used to be Monogram).

Now in order to pack model kits. One must always get a size bigger than the largest model that you have. Then pack the largest kit in first, then you end up being more creative in the packing of the rest of the smaller kits. Do not pack them so that they will be squashed in, but pack them in so that they are "snug" and don't move around. You should only need maybe one or two large boxes if you have a small collection. If you're a major collector/builder and have model kits in the neighbourhood of 3000 or more, then you'd best be looking at a container to ship your kits in. Ahhh-So-Easy has containers that you can lock up as do some other personal container companies. Of course the personal containers have some cost to them but when you have a large number of kits, that may be the only way to get your kits from one place to another without having to keep track of large numbers of boxes.

Here's how I've packed a number of small kits in a box. Notice that there is space enough for some more 1/144 kits, however since I don't have them, they've just become space. I do plan on going on the 17th and buying a large box so that I can amalgamate all my model boxes into two big boxes of models. That way, I can free up a few more boxes for other belongings. I do intend on getting one so that I can rearrange some of the boxes and put some other stuff in there. For about $3.75 at U-Haul , I believe, I could get a pretty nice size box and save some of my other boxes for other belongings.

Entry Dated September 9, 2008 - How To Move With Models

How to move with model kits? Well, folks, our time at this location has come to an end and I'm able to get back my modeling space. Of course, that entails a move. One of the things that a lot of scale modelers hate is moving. Especially when they have to individually pack up their displays. Invariably builds get given to friends as parting gifts or donated to a military museum of some sort if there's one in the general area. Otherwise it's packing each individual model in it's own box or if you buy foam mattress core, it's a pain-stakingly painful process cutting each form to fit the model's general shape. It's always a good idea to label the foam core as you can use it for future moves (if you're a constant mover like me (9 moves in 8 years??? Yes, we've moved all over the Lower Mainland in the last 8 years, this will be our 10th move in 8 years; after this we're remaining planted for the nex 5-7 years).

Remember to label the boxes that you stick the foam cores and lovingly bundled models into as "FRAGILE-DO NOT CRUSH, DROP OR BUMP! CARRY INDIVIDUALLY" The boxes can feel deceptively light and if other movers are involved, they tend to want to take multiple boxes at a time if they are light. And that is the last thing you want them to do. Picture two words "crushed models". Better yet, take them over yourself via your own vehicle.

Our move this month is at the end of the month, and most of my stash is unbuilt so moving is relatively simple. Just get a few cardboard boxes and put my unbuilt stash into them. A tip is size your box to the largest kit that you plan to put into that box and then fit your other models around them. A good rule of thumb is to get a box that fits two Tamiya 1/32 F-14 Tomcats (unbuilt kit boxes) sitting flat on the bottom of the box. Then you can put the rest of the kits around and fit them. If one of your favorite video games is Tetris, you'll be good at this.

Currently I only have three kits in the midst of being built. And what I use to transport that is a container filled with packing peanuts. However the best way is the foam-core cut-out form of packing as the friction from the foam core and the form fitting cutout will prevent the model from moving around. Over the course of the next few weeks, I'll be taking pictures to populate this blog on how to effect a move with multiple kits. I do have a MiG 23 that I will be stripping the paint from (once I get there and redoing) so I'l pack it with foam core and do a step-by-step on that process. Watch for an edit to this post.
What should be my builds after the F-14A Tomcat "Sukhoi Killers, the Supermarine Spitfire Mk. II and the Monogram MiG 29 Fulcrum? Well, I've got several ideas. I have a Monogram F-117A Nighthawk, and the 1/48 Testors SR-71. I have yet to crack open the SR-71 to see how difficult the kit is, but I have the F-117A Nighthawk open and from what I can see inside the kit, the parts shouldn't be difficult at all. Plus considering it's all one color-scheme (flat black) it should be just fine. All it will take is FS 27038 (Coal Black) or FS 37038 (black) applied with a single action airbrush, after being pre-shaded with white or grey. The Coal Black will have to have dull-cote applied to it as it is a semi-gloss. Of course, the tough part of the build will be the actual scribing of the panel lines as black is very hard to see panel lines on. The build should take a few days provided I can stay focused and build for several days. The most color I'll probably be using is the grey and white.


When you look at the cockpit, even the seat-cover is grey. There are no ejection seat loops as on the GRU-7A ejection seat because this is an ACES II. When you've got a stealth aircraft you don't want any part sticking out. The cockpit will be built from the kit, considering its inaccuracy, I'm going to keep the cockpit closed and pretty much most of the build will concern the exterior of the aircraft. I'll check the Monogram cockpit out and see how accurate it is, but given the experience with the Monogram F-14A, I don't hold out too much hope on it being very accurate. But given a little searching on the internet, I found one of my ARC mods has written an article on the build he did for Internet Modeler (http://www.internetmodeler.com/1999/february/aviation/av_f-117.htm) in 1999. I'll have to ask him his impression of the cockpit while building it. He feels that the cockpit panels were pretty accurate with the LCDs in the right place.


Evidently, there will be some problems with the join fit between the body and the wingroots and that can be simply filled in with putty. It's just a matter of "how much". If it's a lot, I may go with red auto-glazing putty that Steve F. used. Because I don't have a whole helluva lot of the Tamiya putty after my going a little nuts with it on the MiG 29.

Photobucket
Photobucket

I can't vouch much for the cockpit of the SR-71 since I don't know who's built that monster. I know I can manage to scrounge up a True Details cockpit set TD48478 SR71 BLACKBIRD COCKPIT SET for around $20.00 US. Looks like I'm gonna have to hit a mail-order store to get it. Oh well, if I can't get it, I'll just build it cockpit closed. Either that, or I take the pictures that I find and scratch-build panels true to detail.


These builds will be worth the time and the effort put into it. Plus it'll give me some experience in preshading as well as weathering. After a flight, these birds must have really gotten grimy with the heat and the expansion of the different panels. I've always been interested in the SR-71 after the Blackbird's visit to Abbotsford in 1986 and hearing it fly for the first time. You have never heard loud until you've heard the J58s on the Blackbird. Damn, those things are earsplitting. Imagine ripping paper amplified 500 times coupled with the sound of a 747 taking off and that's the sound that you'll get from the twin J58s of an SR-71. Thus, I've always wanted to have an SR-71 in my model collection and now I've got one. So this build will be a stroll down memory lane as well as an easy build to gain experience in building.

Entry Dated August 30, 2008 - What you can find to help you on YouTube

Building models is probably not the easiest thing to do and a lot of us aren't really happy with just reading text on pages and books. Some of us like to have some sort of visual on how certain techniques are done. This is what Brett Green at Hyperscale has teamed up with Testors to create. The Testors Scale Workshop video series. These are to help provide a visual reference for people who want to learn how to use those techniques to better their model kits.

I for one have been confused by people talking about pre-shading, post-shading, and oil-washes, how to set them up and how to use them. I'm looking forward to trying out these new techniques now that I have visualized how they work and how to go about implementing them in whatever models I tend to like to tackle.

So, if you're confused, take a look at these videos and see if Brett Green can give you a hand too.

Brett Green's Testors Scale Workshop Videos on YouTube

Entry Dated August 29, 2008 - Outfitting the new hobbyroom

When one thinks of a good work area for building models, one thinks of having a good solid desk with ample room to build multiple projects on, a space for a paint booth, and a good shelf for model kits, with enough clearance to build a roll-out rack for the compressor. Now, I've found a $199.99 Mastercraft workbench and a Mastercraft Heavy Duty shelf for $89.99 for all my kits. The shelf can go into the storage room (that is if we manage to have one that big. I think I'm going to stop collecting for now (after I nail down that Eurofighter) and start building. Maybe a few practice kit acquisitions, but other than that. I gotta start to build what I currently have. A parts organizer for several of my resin parts would be nice. That way, I'm able to reach for an AMRAAM or an AIM-9X when I need one to go on an F-16C (Block 32) Aggressor from Elmendorf or something.

Workbench
shelf

Looking forward to the new location where we move to is one of my pastimes now. Figuring out how to set up the hobby room is going to be one of the tricky parts of this move. Considering the fact that all three bedrooms are in use now, the livingroom will be the new hobbyroom, so thus, I wil be building models in there, and making sure that my work doesn't interfere with the decor of the room. Whatever all happens, at least moving to a new place will make being able to pull out the kits to work on them a lot easier.

Entry Dated August 16, 2008 - Outfitting your basic tool setup, or "What do I need to dive into model-building?"

Starting the modeling process: (thanks to Steve Wilder of ARC for providing the nuts and bolts of the post)

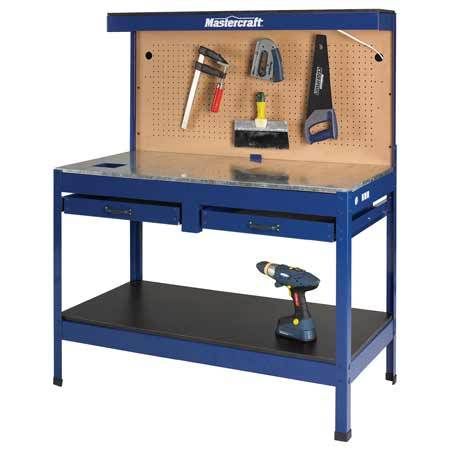
1) Find a suitable place to set up a model-bench. You need a place to work out of. It could be as simple as the kitchen table for starters or a shelf at waist height in a corner closet (nice thing about those is you can just pull the door closed on the corner closet and no one is the wiser.

2) A cutting mat or a cutting board, you can get one of those at a $ store. That way you don't put nicks and scratches into your $800.00 white-ash kitchen table which would probably cause your wife to do elaborate things to your nuts with a kitchen paring knife.

3) X-Acto knife or a surgeon's scalpel with good sharp blades. Nothing works worse or is more dangerous than a dull knife.

4) Glue, (There are various types which will be covered in another post)

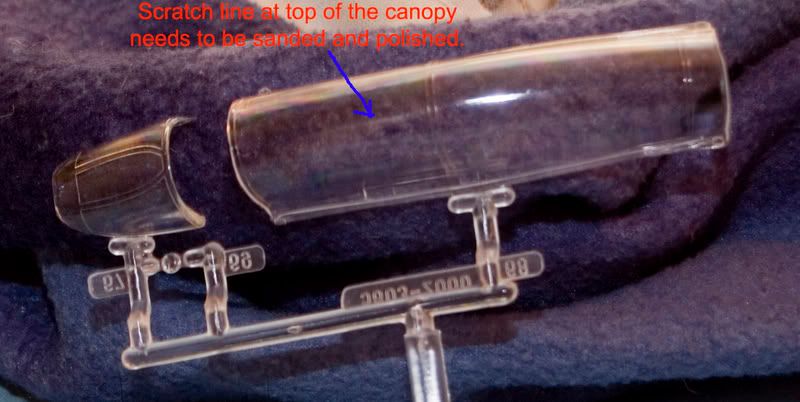
5) Modeler's putty, There's various types and some work better than others but they all serve a purpose, the most important being to take care of seams.

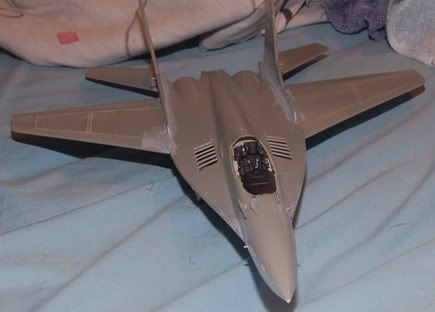
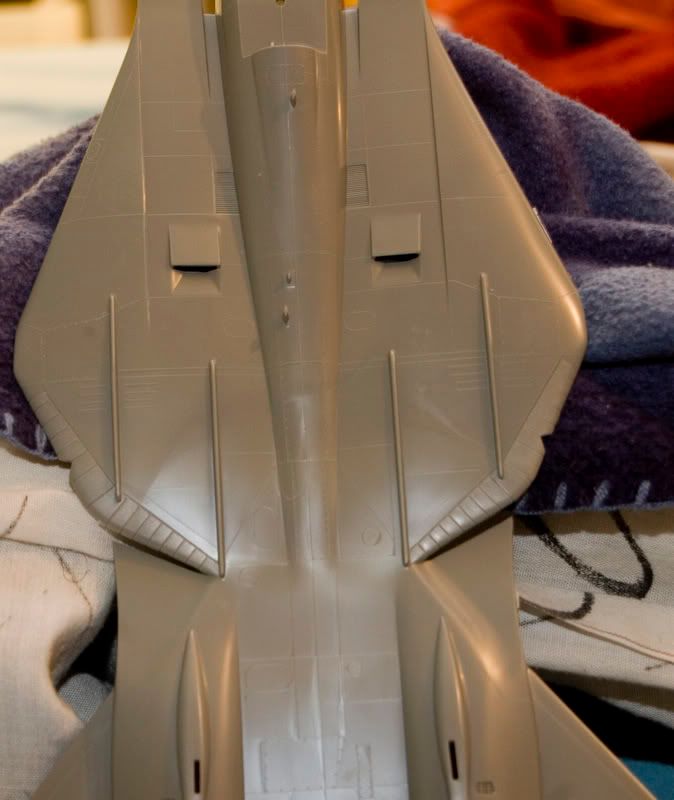
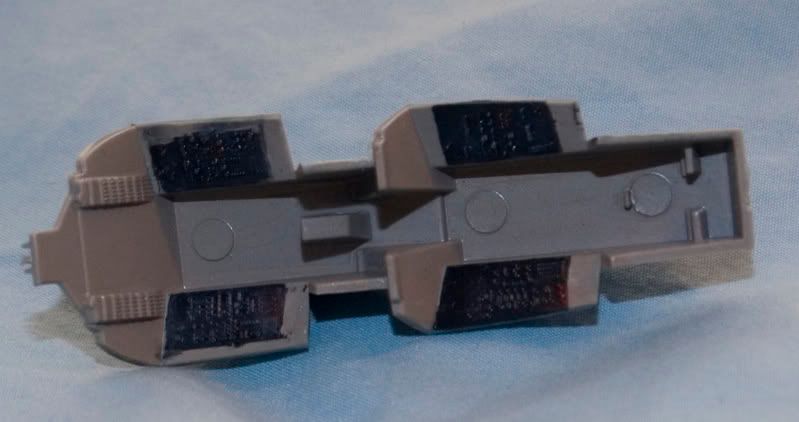
6) Q-tips - these are great for removing excess gunk from weathering washes that you do. There's other uses that will be demonstrated as I resume building my F-14A "Sukhoi Killers" Tomcat.

7) Toothpicks

8) Fingernail polish remover
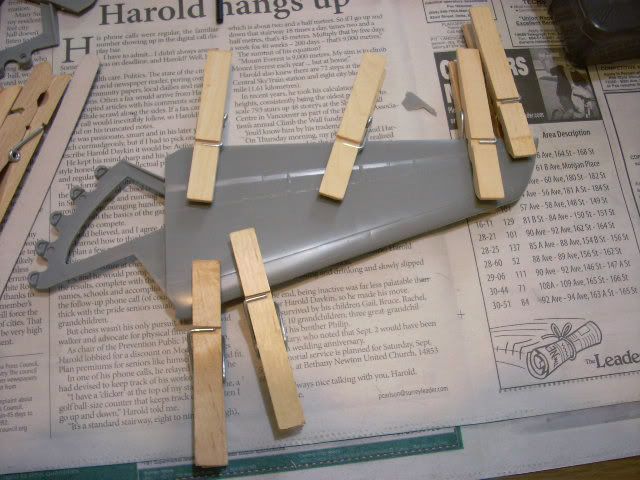
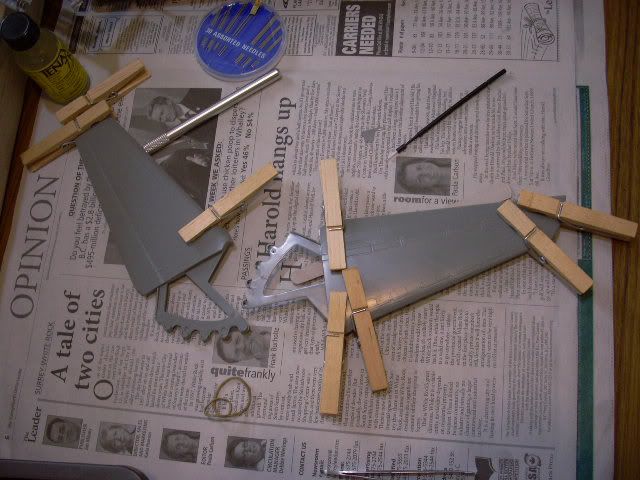
9) Clothes pins

10) Other types of clamps, because some parts are a bit too big to clamp with clothespins

11) Mr. Surfacer by Gunze, an incredible little bit liquid surfacer for model kits that you can use if you need a smooth surface. Quite obvious isn't it?

12) Glue Applicator - no more squeezing the Testors tube glue out of the tube. Apply it with a tooth pick.

13) Various grades of sandpaper - you do know that there is 4000 grit sandpaper right?

14) sanding sticks - same as above, you can find them in the beauty section under fingernail polishers or get your significant other to get 'em for you.

These are some of the basic tools that you will need to do any model-building.

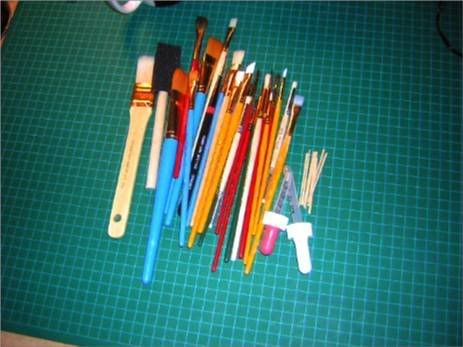
Here's some pics of some of the basic tools I have that I've been using contained in this list.

A few of the brushes that I have bought.

Brushes

These are my X-Acto knives, scribers, files and sanding sticks

X-Acto Knives, Scribes and Sanding Tools

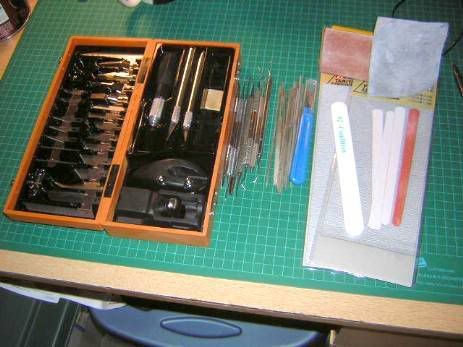
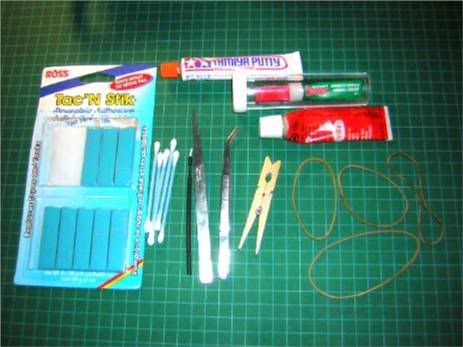
Blue-tak for camoflage patterns, Q-tips, a glue applicator, tweezers, glue, clothespins and elastic bands.

Glue, Blu-tak, Qtips, Putty.

Some of the stuff I have pictured in these photos are not really basic modeling tools, but they are used in advanced modeling techniques. I'll be showing when those will be needed.

Entry Dated August 16, 2008 - Safety and Expensive Tools; Well Worth Every Penny

Tools are essential to a model-builder. And I've managed to get a few of them. I'm still short a full set of modeling tools and I dare not touch my resin kits without getting a particulate face mask. Resin dust is carcinogenic and does not leave the body once inhaled, so be very careful when using resin correction kits.

So what should you get. Well, first of all, I would suggest a respirator mask. If you're going to be dealing with airbrushing enamel paint, you need a good solid respirator. Sure the paint fumes might smell nice, but do you really want lung-cancer down the road after years of smelling this stuff?

particulate respirater

Get yourself a compressor, it can be one of the small oil-less silent desktop compressors that operate on a single piston. I recommend the Bear-Air Polarbear. The air pressure stays constant between 10-30 psi where you end up doing the majority of your airbrushing. It's got suction cups so that you can lock it down so that it doesn't vibrate. Me, I've got the Husky 3.0 Gallon Air Compressor, but if I need to all of a sudden paint indoors, then I'll probably pick up the Bear-Air so that I won't disturb my neighbors.

Husky 3.0 gallon air compressor

As stated the compressor for your workbench or under your workbench should have pressure gauges. The Husky that I have has two. Also, always know where your quick-release valve is and if you're not painting after the end of the session, release the air in the tank. More than likely you're not going to use it so why let it sit there and collect moisture. Also, people mention getting an in-line moisture trap between the main pressure valve and the airbrush to catch the moisture coming up the line. You don't want to have moisture spatter on your paint job.

Paasche moisture trap in-line moisture trap

Safety glasses are also essential, Small parts go flying, as does dust and other particulate matter and you don't want that in your eyes. Plus things do have a tendency to catch fire if they're being heated so a good small CO2 extinguisher is a good purchase too. You can get a small CO2 extinguisher at ABC Fire & Safety. Also make sure that you get some decent surgical gloves, some of the solutions that we have to work with, like tire cleaner and thinner are caustic to the hands and thus the hands should be protected.

CO2 Extinguisher
Safety Glasses
Surgical gloves
I've delved a bit into the more expensive tools and safety equipment here. Of all the tools that you get for your modelbuilding, stress the safety issue. There's time to get Dremels, razor saws, etc., but if you don't establish safety rules and use your safety equipment, then you might find yourself having health problems down the road. I'll delve into the other tools in a later post.